
Mini liquor bottles are typically filled and sealed through a sequence of bottle inspection, preparation, controlled filling, closure application and finished-pack checks. The exact equipment depends on the beverage, bottle dimensions, closure and production volume. A miniature pack follows the same need for process control as a larger bottle, but its small opening and compact footprint can make handling more demanding.
For packaging buyers, understanding that sequence helps prevent a common mistake: approving an empty bottle before the filling partner has confirmed it will run on the line. This guide explains the main stages and the questions to ask when sourcing mini glass liquor bottles.
Approve the bottle and closure before line setup
The filling team needs a dimensioned bottle drawing, capacity definition, neck-finish specification and representative samples. Include the closure drawing and the exact liner or stopper reference. The relevant dimensions extend beyond the bottle’s overall height: neck position, internal opening, shoulder profile and base stability can affect handling.
Confirm whether the equipment’s stated format range includes the actual miniature bottle. A machine described as suitable for spirits is not automatically suitable for every 50 ml shape. Guides, change parts, nozzles and cap-feeding arrangements may need adaptation. Ask for a trial with the proposed glass and closure before committing to a production run.
Capacity should also be defined carefully. Brimful capacity is not the same as the intended net fill. The producer must establish the target quantity and measurement method for the applicable market, while the package provides the working volume and headspace needed for the approved operation.
Stage 1: receive and inspect empty bottles
Incoming checks should compare the delivery with the approved specification. Inspect the glass condition, finish, dimensions and cleanliness according to the agreed quality plan. Damaged mouths and defects around the sealing area deserve particular attention because they can affect both handling and closure performance.
Keep lot identification connected to production records. Protect opened pallets or cases from contamination and unnecessary handling. Any glass-breakage response should follow the facility’s documented procedure, including appropriate containment and inspection, rather than simply removing the visibly broken bottle and restarting.
Stage 2: prepare bottles for filling
Bottle preparation depends on the packaging supply condition and the plant’s validated hygiene program. Equipment may use a suitable rinsing medium or controlled air treatment where appropriate. The production team must determine the required method; there is no universal rinse instruction for every bottle and beverage.
SRAML’s spirits monoblock is one example of equipment that can integrate bottle preparation, filling and closing. Its published options illustrate that these stages can be configured differently for a customer’s application. Buyers should ask what is included in the proposed setup and how preparation is verified before product enters the bottle.
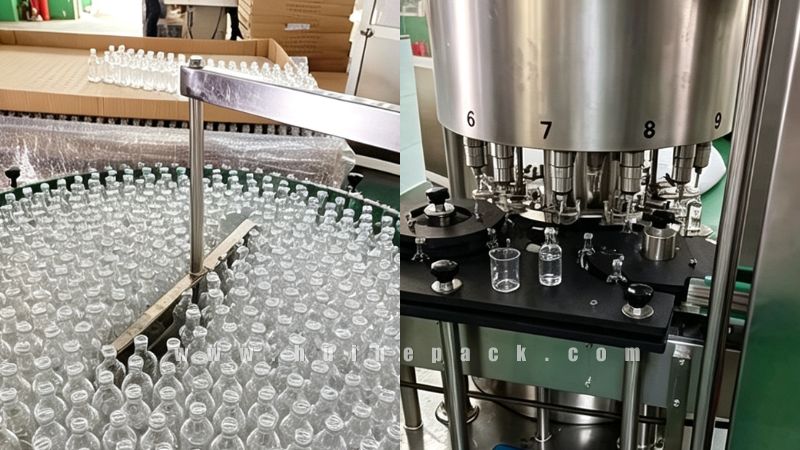
Stage 3: fill with a controlled, repeatable method
Different filling technologies can suit different liquids and production requirements. Equipment suppliers may propose volumetric, level-based or other controlled systems after reviewing the product. Thin spirits and more viscous liqueurs should not be assumed to behave identically. The selected method needs to deliver the required quantity without unacceptable foaming, splashing or contamination of the finish.
SRAML describes low-vacuum filling for its spirits system, with alternative configuration options. This is an example rather than a prescription for every miniature bottle. The buyer should have the filler explain how the chosen system handles the product and how fill accuracy is checked across the expected operating range.
Visual fill height can help reveal inconsistency, but appearance alone does not demonstrate net quantity. Glass containers have dimensional variation, and liquid behavior can change with conditions. Establish a suitable measurement method and keep routine check records. Small packs benefit from careful control because a small absolute deviation can represent a noticeable proportion of the intended fill.
Stage 4: apply the correct closure
Pre-threaded screw caps
A pre-threaded cap engages a corresponding thread on the bottle. The capper must hold the small bottle securely, align the cap and apply it within the approved operating limits. The liner, where used, must seat correctly against the glass. Check for cross-threading, skewed application and damage rather than relying on a cap’s visual presence.
Roll-on pilfer-proof closures
ROPP closures use a roll-on application process with a compatible bottle finish and dedicated capping equipment. The cap is formed onto the finish during application, and the tamper-evident feature must function as intended. A ROPP closure is not simply a pre-threaded cap that can be tightened using any screw-capping head.
Stopper and T-top formats
Stopper systems require the correct bore fit, insertion method and product compatibility. Evaluate retention, removal effort and leakage using the actual miniature bottle. Where an additional tamper-evident feature is needed, specify it separately and validate it with the complete package. Compare suitable liquor bottle accessories before finalizing the neck design.
IC Filling Systems lists separate application options for pre-threaded caps, ROPP closures and T-shaped corks. That distinction reinforces the need to match the closure technology to the line. Its spirits equipment examples also show that equipment selection includes appropriate assessment for the alcohol-handling environment; the filling facility and machinery supplier should establish those requirements.
Stage 5: verify the seal and first-opening feature
Closure checks should be defined with the component supplier and filling partner. Depending on the system, they may include application condition, removal effort, closure position and leakage evaluation. Use agreed sampling and acceptance criteria rather than an informal judgment that the cap feels tight.
Seal integrity and tamper evidence answer different questions. The first concerns containment and barrier performance; the second helps indicate whether opening has occurred. A band can look intact while the primary seal is inadequate. Likewise, a good primary seal does not automatically provide visible evidence of first opening.
Test finished packs under representative storage and distribution conditions. Keep the final label and secondary packaging in the trial where they could affect inspection or handling. Our guide to mini liquor bottle leakage during shipping provides related packaging considerations.

Stage 6: label, code and pack for distribution
Labeling equipment needs to accommodate the short body and limited label panel of a miniature bottle. Confirm that artwork stays clear of curves that can cause wrinkles or poor adhesion. Reserve a readable position for the required lot identification and other coding before approving decoration.
Final inspection should cover the assembled product, including fill presentation, closure condition, label identity and coding. Pack accepted bottles using the approved case configuration. Separate different products and lots through the facility’s traceability process so that a visually similar miniature does not enter the wrong assortment.
| Stage | What buyers should confirm | Common issue to investigate |
|---|---|---|
| Bottle preparation | Documented hygiene and handling method | Unprotected bottles or inconsistent preparation |
| Filling | Format fit and verified quantity control | Splashing, variable fills or unstable bottle handling |
| Closing | Matched finish and application equipment | Skewed caps, damaged components or poor retention |
| Inspection | Defined seal and opening criteria | Visual acceptance without functional checks |
| Case packing | Production-intent protective packaging | Contact damage, leakage or unreadable codes |
Frequently asked questions
Can a standard bottling line handle mini bottles?
Possibly, if its approved format range and change parts suit the exact bottle and closure. Confirm that through supplier review and a physical line trial.
Is one torque setting suitable for all screw caps?
No. Settings depend on the closure, liner, finish and equipment. Use the approved specification and verify application and opening performance.
Does a fill line make the packaging decision for the buyer?
The line constrains what can run reliably, while the brand and packaging team define the presentation and use requirements. Approval works best when those parties review samples together.
Start with a filling-compatible bottle brief
When discussing a project with HUIHE PACK, provide the target capacity, beverage type, closure preference and filling partner’s requirements. Review miniature bottle capacity options alongside the technical drawing. A production trial of the complete pack gives buyers a stronger basis for approval than an empty-bottle sample alone.
Equipment references: SRAML spirits monoblock and IC Filling Systems capping equipment. Equipment configuration and operating parameters must be confirmed for the actual product and package.